
When doing prototype work with breadboards for a project, the question comes up “how to power the breadboard?” at the very start. Therefore, a power supply must be chosen that fulfills the requirements of the specific project. There exist a wide range of different alternatives to provide power to a breadboard. Each alternative has different characteristics. In this article, seven alternatives are presented ranging from low-cost USB-based power supplies to AC/DC power supply units.
Alternative 1 (cheap): Microcontroller
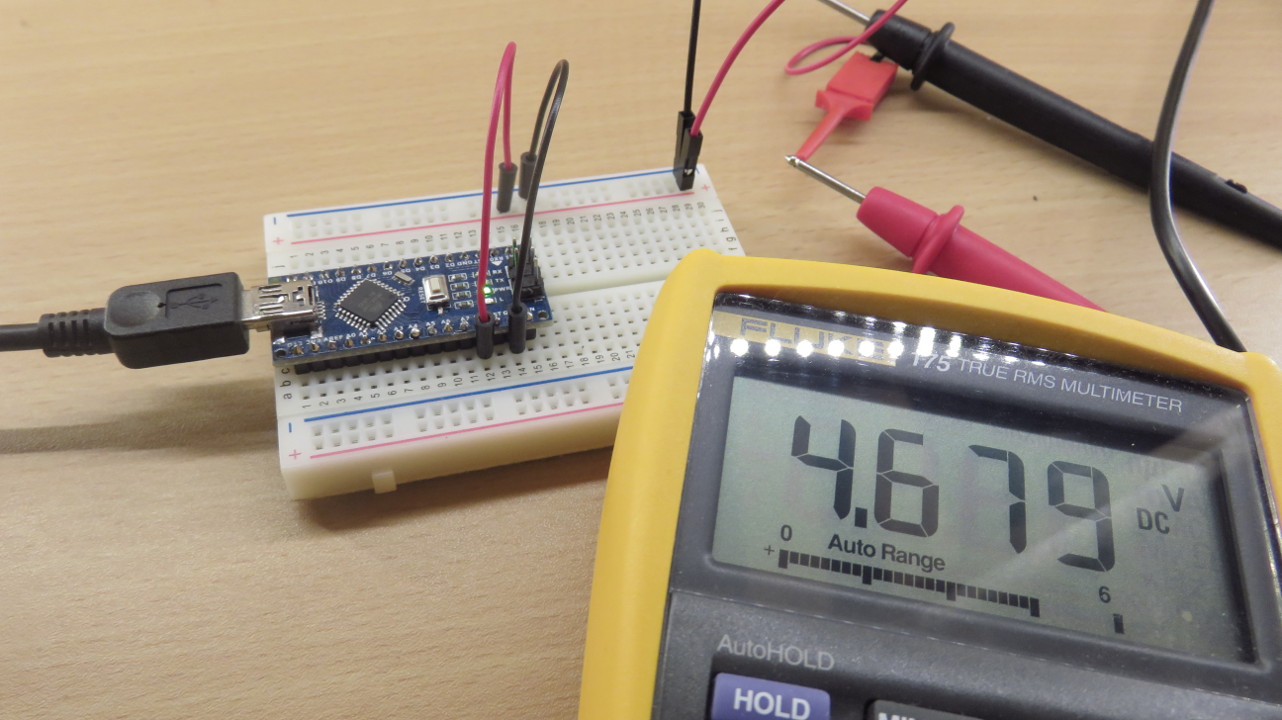
It seems natural to use a microcontroller to power the other components on the breadboard, if you utilize a microcontroller anyway. The advantage is that you require only a single USB cable (or DC plug) to provide power to the microcontroller and all the other components on the breadboard. However, this alternative has at least two drawbacks: First, a typical microcontroller features only very few voltage options. For example, an Arduino Uno has pins for 3.3V and 5V. Second, the current is often limited. For example, when utilizing an Arduino Uno, you can safely draw about 400mA from the 5V pin. In case your microcontroller does not have any output pins to provide power, this alternative is off the table.
Alternative 2 (cheap): Breadboard power supply
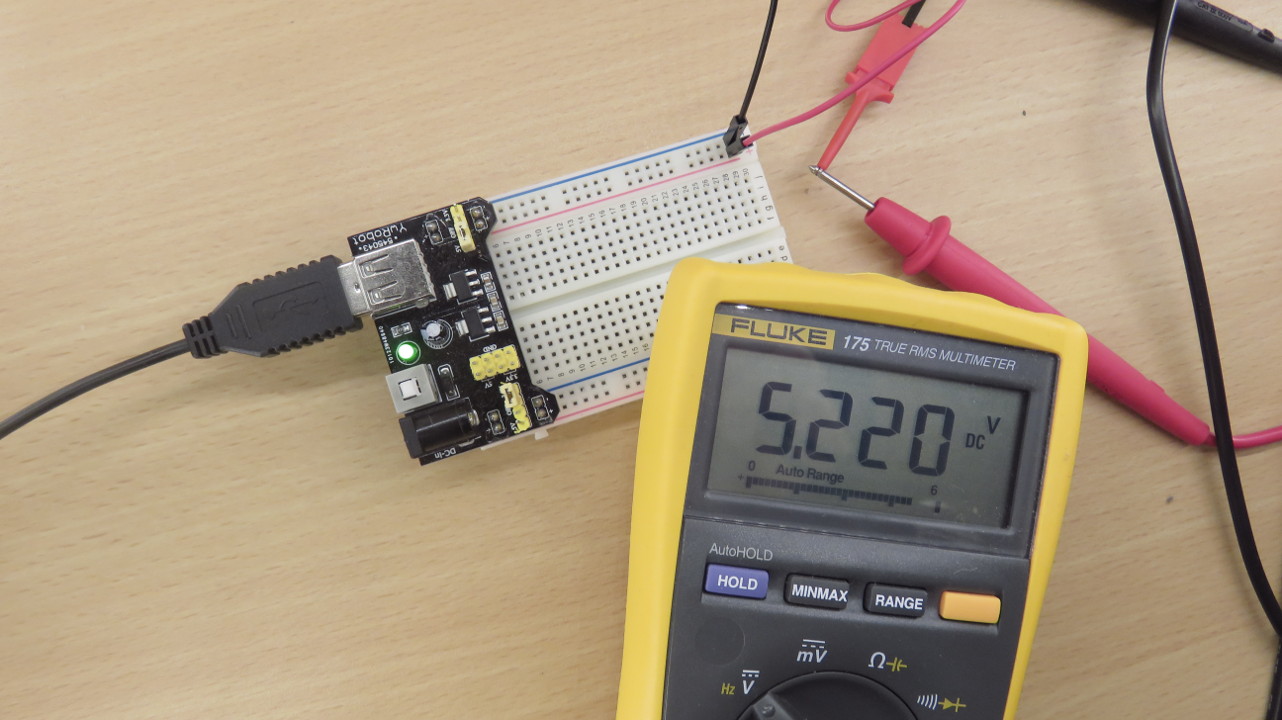
Breadboard power supplies are specifically designed for applications involving a breadboard. As a result, they fit perfectly on a breadboard in order to supply power to the “plus and minus lines”.
Moreover, most breadboard supplies have multiple convenience features: For example, the possibility to plug in different power connectors, such as USB or DC plugs. Furthermore, a switch to ‘switch on’ or ‘switch off’ the power as well as an LED to show whether the power supply is enabled or disabled. In addition, you often can choose whether to supply 3.3V or 5V to the “plus and minus” lines.
In comparison to using microcontrollers for powering, breadboard power supplies often allow you to draw more current than microcontrollers. Unfortunately, most of them are also limited to outpout only 3.3V or 5V. If you require higher voltages, this alternative might not be an option for you.
Alternative 3 (cheap): Batteries + battery holder + PCB terminal
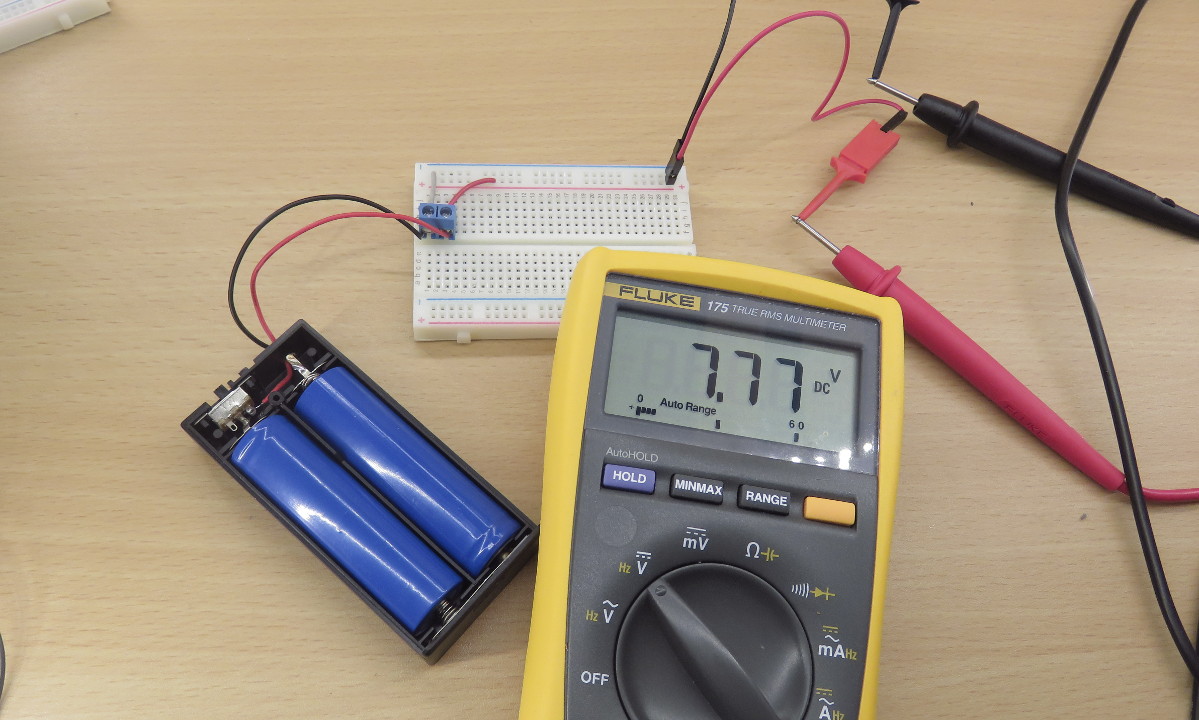
If you already own a pack of batteries, you can also use them for powering. Especially if you own multiple batteries, you can chain them in order to obtain, e.g., a voltage supply having more than 5V. This alternative becomes even better, if you also own a battery holder and a PCB terminal. Then, it becomes very easy to connect the batteries to a breadboard.
For example, if you require more than 5V, you can connect two 3.7V Li-Ion batteries in series to obtain about 7.4V. A major downside of this alternative is that the provided voltage of batteries is dependent on their charging level. As a consequence, this alternative is not suited if a constant voltage is required to power the components. Nonetheless, if you plan to use batteries as power supply for the final version of your project, it might makes sense to use this type of power supply also in the prototype phase.
Alternative 4 (cheap): USB DC-DC Step-up Cables
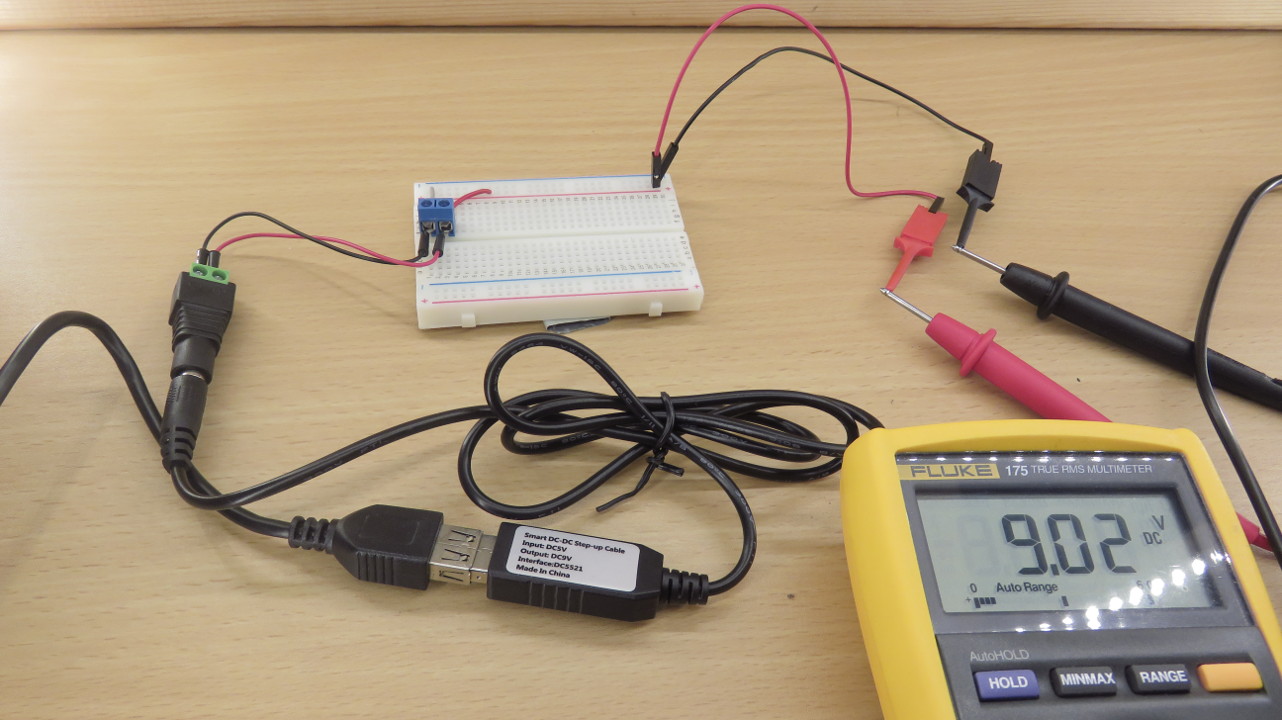
Compared to connecting batteries in series, utilizing USB DC-DC Step-Up cables is a more convenient alternative to obtain higher voltages. The principle is very simple, these cables have a USB connector on the one end, a DC connector on the other end, and in-between a Step-up module. The Step-up modules transform the 5V coming from the USB connector to a higher voltage, such as 9V or 12V. With the help of a female power jack connector, it is quite simple to bring 9V or 12V to the breadboard. Due to their compact construction, the current you can draw from these Step-up cables is often limited to 750mA or 1000mA.
Alternative 5 (reasonably priced): DC Transformer
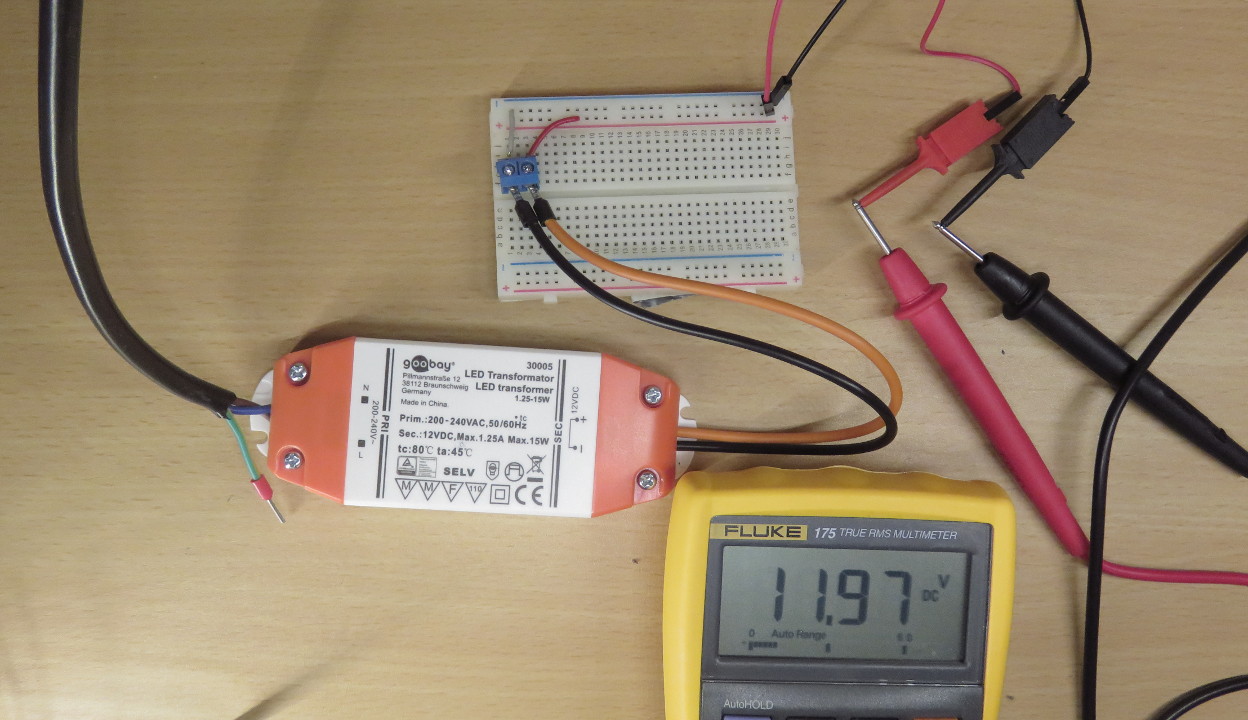
In order to draw more power from a 9V or a 12V power supply, a DC transformer can be used. DC transformers are quite common for providing 12V LEDs with power. Alternatively, they can also be used to supply power to breadboards. In comparison to USB DC-DC Step-up cables, they are much more bulky. However, mainly due to their size, they can provide much more power to a breadboard. There exist many different variants, such as 10W DC transformers or 100W DC transformers. Typically when working with breadboards, very high power values are not required. Nonetheless, if, for example, an external power-hungry device has also to be provided by the same power supply as the breadboard, a dc transformer might be a good choice.
Alternative 6 (cheap): DC-DC Adjustable Boost Module
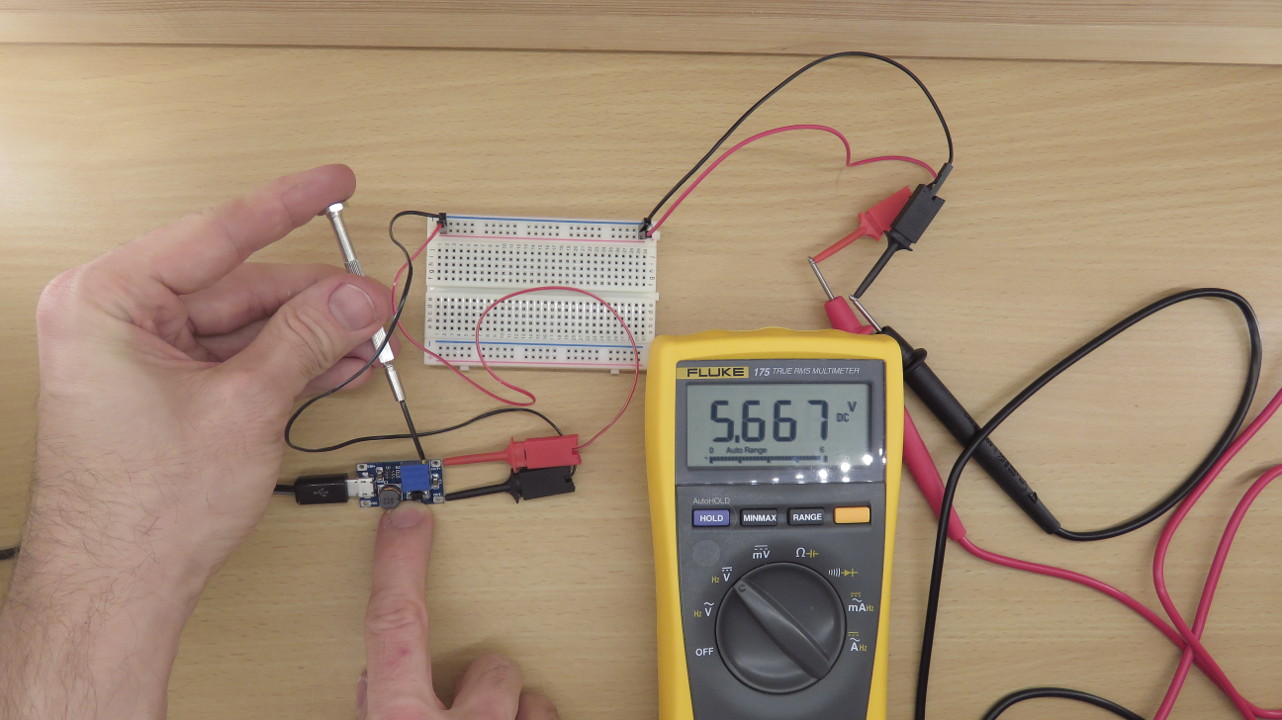
The previous alternatives share the same disadvantage that the provided voltage is typically not adjustable. So-called DC-DC adjustable boost modules overcome this drawback by featuring a potentiometer that can be adjusted by a screwdriver. In particular, the potentiometer controls the provided output voltage. Moreover, many of these modules feature also a USB input. The disadvantage of such module is that they are often limited to 1 or 2 Amperes that can be drawn. Therefore, there range of applications is limited.
Alternative 7 (reasonably priced to expensive): DC power supply unit
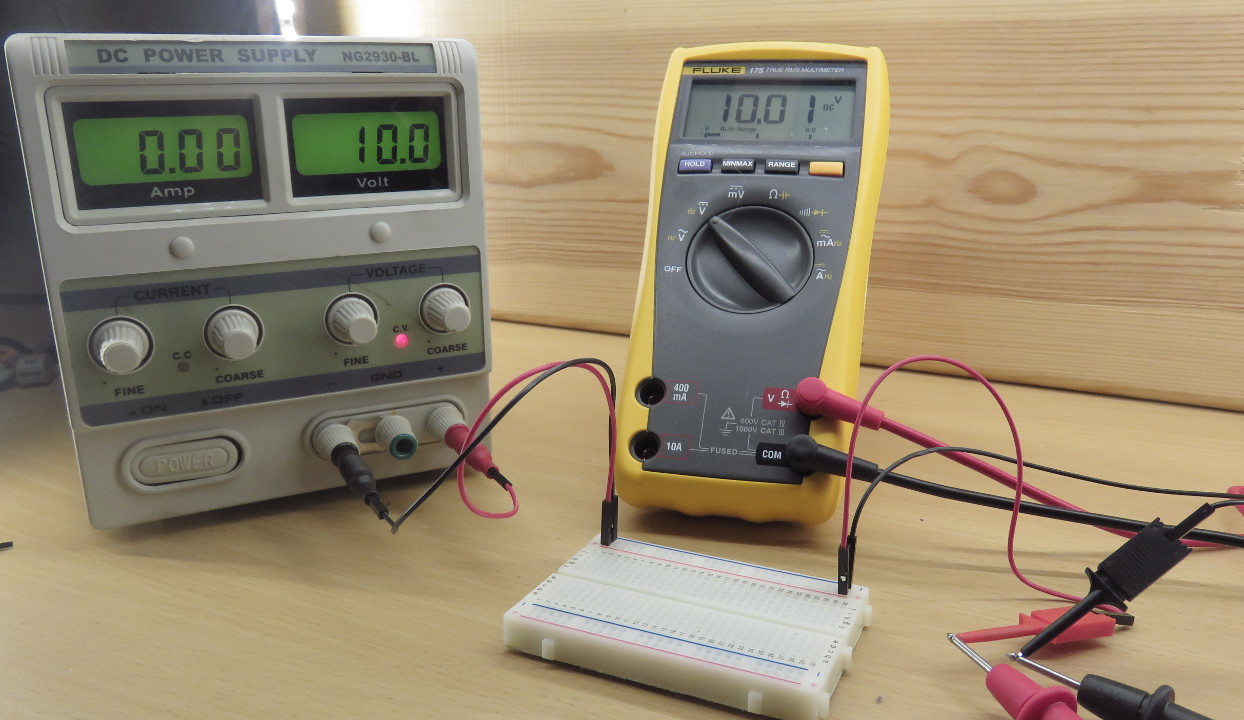
The highest degree of flexibility is offered by DC power supply units. In comparison to the other alternatives, this is the most bulkiest and also most expensive alternative. Though, size and prices can differ a lot between different types of DC supply units. The main advantage of DC power supplies is that the provided voltage can be adjusted very precisely. Moreover, they often provide more power than DC-DC Adjustable Boost Modules. If a DC supply unit is chosen as power supply for a breadboard, you should not forget to look out for a plug that connects the DC supply to the breadboard (e.g. “Banana-to-DuPont-connector”).
Related video:

thank you so much for compiling such a succinct and useful overview.
do you happen to have pdf versions of your written articles available for download?
Unfortunately not. As a workaround, you can print the website as PDF document (if it is sufficient for your use case).
If using a breadboard power supply (option 2, “BPS”) with a micro computer/controller (“MCC”), would you connect the ground from the breadboard to the ground on the MCC? If you are using GPIO pins to control a circuit, is there a change that needs to be made to use a BPS?